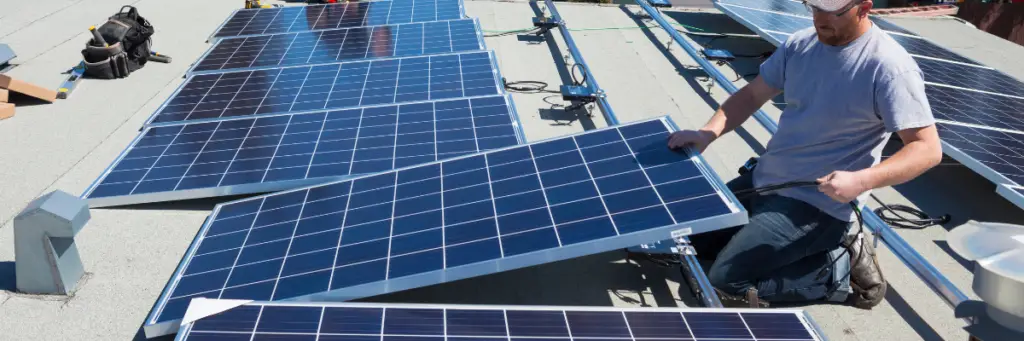
Harnessing the power of solar energy has become increasingly popular as a sustainable and cost-effective solution for generating electricity. Solar panels, also known as photovoltaic (PV) panels, play a crucial role in capturing sunlight and converting it into usable electricity.
However, to truly harness the potential of solar energy, connecting the solar panels to an inverter is essential. The inverter serves as the heart of the solar power system, converting the direct current (DC) electricity produced by the solar panels into alternating current (AC) electricity, which is suitable for powering homes and businesses.
In this guide, I will walk you through a step-by-step process to seamlessly connect your solar panels to an inverter, enabling you to fully enjoy the benefits of solar energy while contributing to a greener and more sustainable future.
Table of Contents
How to Connect Solar Panels to an Inverter
If you want to connect solar panels to an inverter, you need to follow a few simple steps. Here’s a step-by-step guide to help you out:
Step 1: Determine Your Power Needs
Before you start connecting your solar panels to an inverter, you need to determine your power needs. You should calculate the total power consumption of your appliances and devices that you want to run on solar power. This will help you determine the number of solar panels and the size of the inverter you’ll need.
Step 2: Choose the Right Inverter
Once you know your power needs, you should choose the right inverter. Make sure to select an inverter that is compatible with the voltage of your solar panels and the power output you require. You should also consider the type of inverter you need, such as a pure sine wave or modified sine wave inverter.
| Factors to Consider | Description |
|---|---|
| Maximum Power Output | Should match or exceed the power output of your solar panels |
| DC Voltage | Should be compatible with the voltage of your solar panels |
| Efficiency | A higher efficiency means more DC power is converted to AC, resulting in less energy loss |
Step 3: Wiring Your Solar Panels in Series or Parallel
After selecting an inverter, you need to wire your solar panels in series or parallel. Wiring in series increases the voltage, while wiring in parallel increases the current. You should choose the wiring configuration that meets the voltage and current requirements of your inverter.
Step 4: Connect Your Solar Panels to the Inverter
Once you’ve wired your solar panels, you need to connect them to the inverter. You should connect the positive and negative terminals of the solar panels to the corresponding input terminals of the inverter. Make sure to follow the manufacturer’s instructions for proper wiring.
Step 5: Connect the Inverter to the Battery or Grid
After connecting the solar panels to the inverter, you need to connect the inverter to the battery or grid. If you’re using a battery, connect the inverter to the battery terminals. If you’re connecting to the grid, connect the inverter to the electrical panel using a dedicated circuit breaker.
Step 6: Install a Charge Controller (If Needed)
If you’re using a battery, you should install a charge controller to regulate the charging of the battery. A charge controller prevents overcharging and prolongs the life of the battery. Make sure to choose a charge controller that is compatible with your solar panels and battery.
Determining Your Power Needs
Before connecting a solar panel to an inverter, it is essential to determine your power needs. This will help you choose the right size of solar panel and inverter to meet your energy requirements.
The power consumption of your appliances and devices is measured in watts. To calculate the total wattage of all the appliances you want to power with solar energy, you need to add up the wattage of each appliance. You can find this information on the label or manual of the appliance.
Consider the voltage and current requirements of your appliances. Most appliances operate on 120 volts AC in North America and 220 volts AC in Europe and other parts of the world. The current requirement of an appliance is usually listed on its label or manual.
Once you have determined the total wattage, voltage, and current requirements of your appliances, you can choose the right size of solar panel and inverter. A solar panel’s power output is measured in watts, and an inverter’s power rating is also measured in watts.
It is recommended to oversize your solar panel and inverter by 25% to 30% to ensure that you have enough power to meet your energy needs. This will also help you to accommodate any future increase in power consumption.
Choosing the Right Inverter
When it comes to connecting a solar panel to an inverter, choosing the right inverter is crucial. In this section, we will discuss the different types of inverters, inverter sizing, and inverter efficiency.
Types of Inverters
There are three main types of inverters: grid-tie, off-grid, and hybrid inverters.
- Grid-tie inverters are designed to convert DC to AC and synchronize with the utility grid. They are the most commonly used type of inverter in residential solar systems.
- Off-grid inverters are used in systems that are not connected to the utility grid. They typically have a built-in battery charger and can handle both DC and AC power.
- Hybrid inverters are a combination of grid-tie and off-grid inverters. They can operate in both grid-tie and off-grid modes and can also be used with battery storage systems.
Inverter Sizing
Inverter sizing is an important consideration when choosing an inverter. The size of the inverter should be based on the maximum power output of the solar panels.
When sizing an inverter, it is important to consider the maximum power output of the solar panels, the DC voltage of the solar panels, and the power factor of the inverter.
Inverter Efficiency
Inverter efficiency is another important consideration when choosing an inverter. Inverter efficiency refers to the amount of DC power that is converted to AC power.
A higher efficiency inverter will convert more DC power to AC power, resulting in less energy loss and increased system performance. It is recommended to choose an inverter with a high efficiency rating, ideally above 95%.
Wiring Your Solar Panels
When it comes to wiring your solar panels, there are three main types of connections you can make: series, parallel, and series-parallel. Each connection has its own benefits and drawbacks, so it’s important to understand them before deciding which one to use.
Series Connection
A series connection involves connecting the positive terminal of one solar panel to the negative terminal of another panel, creating a chain. This increases the voltage while keeping the current the same. Series connections are useful when you need to increase the voltage of your solar panel system, such as when you have a long distance between your panels and your inverter.
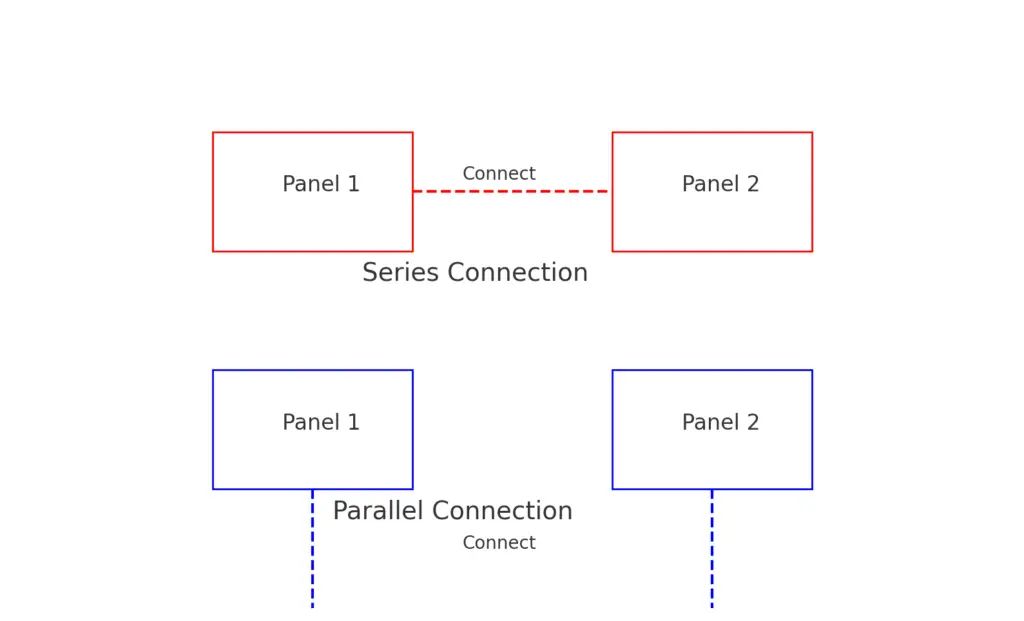
Parallel Connection
A parallel connection involves connecting the positive terminals of multiple solar panels together, and the negative terminals together, creating a parallel circuit. This keeps the voltage the same while increasing the current. Parallel connections are useful when you need to increase the current of your solar panel system, such as when you have shading issues on some of your panels.
Series-Parallel Connection
A series-parallel connection combines both series and parallel connections. This involves wiring solar panels in series by connecting positive to negative terminals to increase voltage and then connecting these strings in parallel. This allows you to increase both the voltage and current of your solar panel system.
When wiring your solar panels, it’s important to keep in mind the voltages of your panels and your inverter. Make sure to use wiring that can handle the voltage and current of your system. It’s also important to use proper connectors and to follow the manufacturer’s instructions carefully.
Connecting Your Solar Panels to the Inverter
When it comes to setting up a solar power system, connecting your solar panels to the inverter is a crucial step. In this section, we will discuss the two key factors to consider when connecting your solar panels to the inverter: the maximum DC input voltage and microinverters.
Maximum DC Input Voltage
Before connecting your solar panels to the inverter, it is important to ensure that the maximum DC input voltage of the inverter matches the voltage output of your solar panels. The maximum DC input voltage is the maximum voltage that the inverter can handle from the solar panels.
If the voltage output of your solar panels is higher than the maximum DC input voltage of your inverter, it can cause damage to the inverter. On the other hand, if the voltage output of your solar panels is lower than the maximum DC input voltage of your inverter, it can result in lower efficiency.
To avoid any issues, it is recommended that you check the specifications of both your solar panels and inverter to ensure that they are compatible. If they are not, you may need to consider purchasing a different inverter or adjusting the configuration of your solar panels.
Microinverters
Microinverters are a type of inverter that are installed on each individual solar panel, rather than a single inverter for the entire system. This allows for each panel to operate independently, which can lead to increased efficiency and better performance in shaded or unevenly lit areas.
When using microinverters, the maximum DC input voltage is not as important as with traditional inverters. This is because each microinverter is designed to handle the voltage output of a single solar panel, rather than the combined output of multiple panels.
However, it is still important to ensure that the microinverters you choose are compatible with your solar panels. This can be done by checking the specifications of both the microinverters and solar panels before making a purchase.
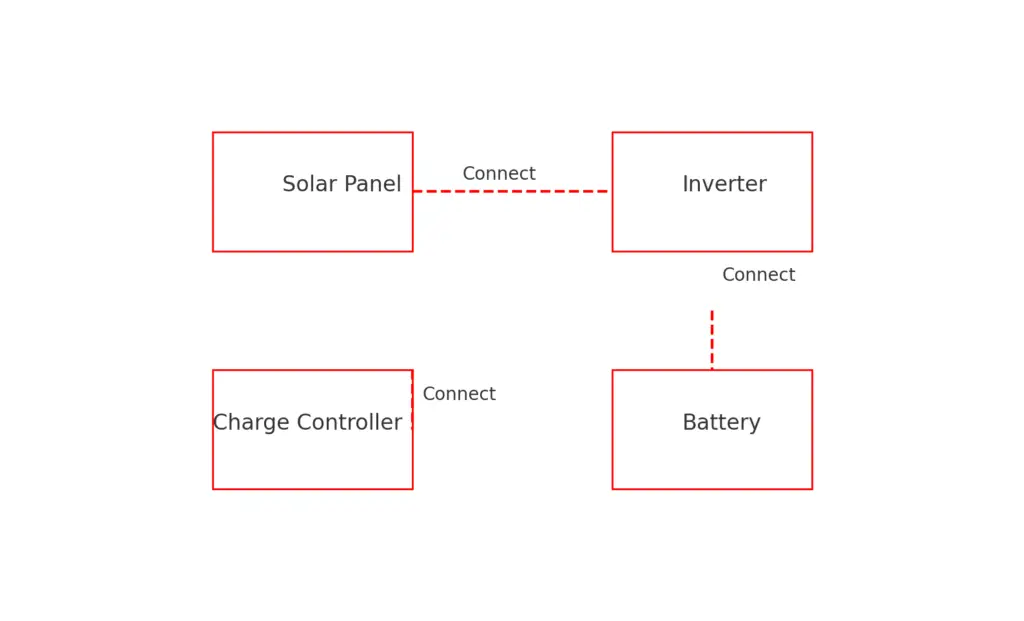
Connecting the Inverter to the Battery or Grid
Once you have connected your solar panels to the solar charge controller, the next step is to connect the inverter to either the battery or the grid. The process of connecting the inverter to the battery or grid depends on whether you have an off-grid or grid-tied system.
Off-Grid System
In an off-grid system, the inverter is connected directly to the battery bank. The battery bank stores the energy generated by the solar panels and provides power to the inverter. Here are the steps to connect the inverter to the battery bank:
- Determine the cable size required for the inverter based on the owner’s manual.
- Connect the inverter to the battery bank using the appropriate cable size.
- Make sure the inverter is turned off before connecting the cables.
- Connect the positive cable from the inverter to the positive terminal of the battery bank.
- Connect the negative cable from the inverter to the negative terminal of the battery bank.
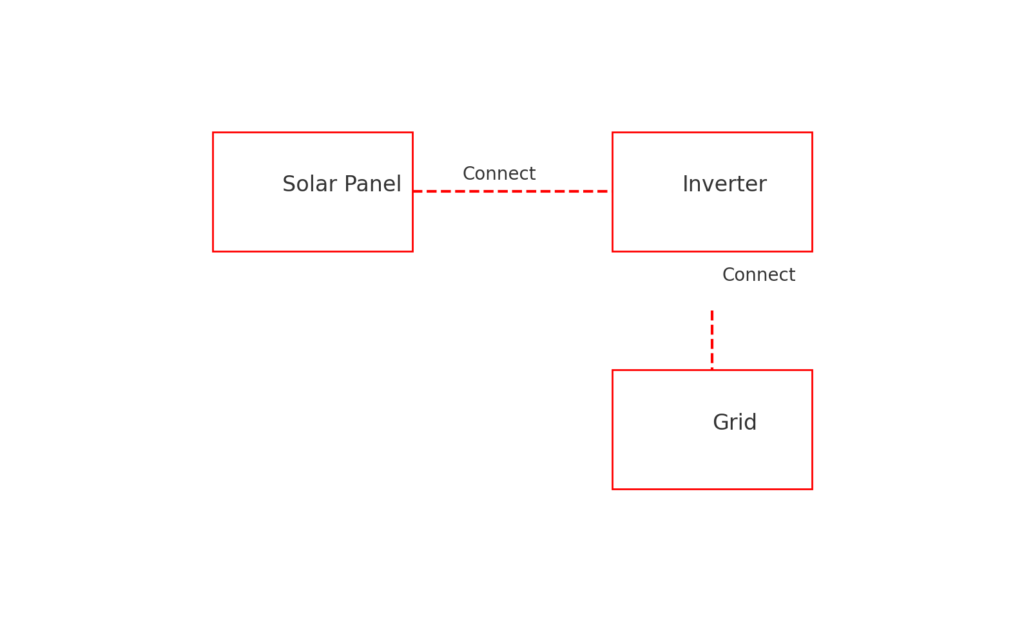
Grid-Tied System
In a grid-tied system, the inverter is connected to the grid and the solar panels. The inverter converts the DC electricity generated by the solar panels into AC electricity that can be used by your home or business. Here are the steps to connect the inverter to the grid:
- Connect the solar panels to the inverter using the appropriate cables.
- Connect the inverter to the grid using the appropriate cables.
- Make sure the inverter is turned off before connecting the cables.
- Connect the AC output of the inverter to your home or business electrical panel.
- Turn on the inverter and check the LED lights to ensure it is functioning properly.
When connecting the inverter to the grid, it is important to follow local regulations and obtain any necessary permits. Additionally, it is recommended to have a licensed electrician perform the installation to ensure it is done safely and correctly.
Installing a Charge Controller
When it comes to connecting your solar panel to an inverter, it’s essential to have a charge controller installed in the circuit. The charge controller regulates the amount of current and voltage that flows from the solar panel to the battery. Without a charge controller, the battery can overcharge, which can damage the battery and reduce its lifespan. In this section, we’ll discuss the different types of charge controllers, charge controller sizing, and PWM vs. MPPT.
Types of Charge Controllers
There are two primary types of charge controllers: PWM and MPPT. PWM stands for Pulse Width Modulation, and MPPT stands for Maximum Power Point Tracking. PWM controllers are simple and inexpensive, making them a popular choice for small solar systems. MPPT controllers are more complex and expensive, but they are more efficient and can handle higher power loads.
Charge Controller Sizing
The size of the charge controller you need depends on the size of your solar panel array and the battery bank. To determine the size of the charge controller, you need to calculate the current and voltage of the solar panel array and the battery bank. The charge controller should be rated to handle the maximum current and voltage of the solar panel array and the battery bank.
PWM vs. MPPT
PWM charge controllers are less expensive than MPPT charge controllers, but they are less efficient. PWM controllers reduce the voltage of the solar panel to match the voltage of the battery bank, which results in a loss of power. MPPT controllers, on the other hand, convert the excess voltage into additional current, which results in more power being delivered to the battery bank. MPPT controllers are more expensive, but they are more efficient and can handle higher power loads.
| Cost | Efficiency | Power Loads | |
| PWM | Less expensive | Less efficient | Handles lower power loads |
| MPPT | More expensive | More efficient | Handles higher power loads |
Frequently Asked Questions
What Is the Purpose of Connecting Solar Panels to An Inverter?
The main purpose of connecting solar panels to an inverter is to convert the direct current (DC) electricity produced by the solar panels into alternating current (AC) electricity that can be used to power household appliances and be fed into the electrical grid.
What Type of Inverter Do I Need for My Solar Panels?
The type of inverter you need depends on the type of solar panel system you have. For most residential installations, a string inverter is commonly used. Microinverters are also an option, where each solar panel has its own dedicated microinverter. Additionally, there are hybrid inverters available that can store excess energy in batteries for later use.
Can I Install the Inverter Outdoors?
Yes, some inverters are designed for outdoor installation. However, if you live in an area with extreme temperatures or harsh weather conditions, it’s essential to choose an inverter that is rated for such environments.
How Many Solar Panels Can I Connect to One Inverter?
The number of solar panels you can connect to one inverter depends on the inverter’s capacity and the total wattage of the solar panels. It’s crucial to ensure that the combined wattage of the panels does not exceed the inverter’s maximum capacity.
Can I Connect Solar Panels of Different Wattage to The Same Inverter?
In some cases, it is possible to connect solar panels with different wattages to the same inverter. However, it’s generally recommended to use panels with the same wattage and specifications to optimize the overall performance of the system.
Do I Need Any Special Wiring to Connect the Solar Panels to The Inverter?
Yes, the wiring used to connect solar panels to the inverter should be appropriately sized and rated for outdoor use. It’s essential to follow local electrical codes and guidelines to ensure safety and efficiency.
Do I Need a Battery to Connect Solar Panels to An Inverter?
No, you don’t necessarily need a battery to connect solar panels to an inverter. Inverters can be used for grid-tied systems where excess electricity is fed back into the grid. However, if you want to store the excess energy for later use, you’ll need a battery storage system as well.
Can I Connect the Inverter to My Home’s Electrical System Myself?
Installing a solar panel system and connecting the inverter to your home’s electrical system can be complex and potentially dangerous if you’re not familiar with electrical work. It’s recommended to hire a licensed and experienced solar installer to ensure a safe and proper installation.
How Much Maintenance Does the Inverter Require?
Inverters are generally low maintenance, but it’s essential to keep them clean and free from debris. Some inverters have built-in monitoring systems to help identify issues, and regular checks by a professional are advisable to ensure optimal performance.
Can I Expand My Solar Panel System and Connect More Panels to The Existing Inverter?
The possibility of expanding your solar panel system depends on the capacity of your existing inverter and the local regulations. If your inverter has extra capacity and your electrical infrastructure can handle the additional load, it is often possible to expand the system.